
[Originally posted June 2012. Last updated in June 2021. For a video on this topic, click: https://youtu.be/otPTkvnrPlc.]
 The Mail Merge feature of Microsoft Word is one of my favorite parts of the program. It is extremely powerful for creating labels and customized letters, emails, or reports. Once you learn how to use it, you can save countless hours of work. Unfortunately, the task of learning to master all of its idiosyncrasies can give you countless headaches.
One of the perennial annoyances of Mail Merge is its inability to format numbers from an Excel spreadsheet correctly. For example, a sales result in Excel appears as 100 but in Word it suddenly becomes 99.99999999996!
Fortunately, there are no less than three different ways to get Mail Merge numbers to appear the way they should.
[Note for users of various versions of Microsoft Office: The steps presented here are for Office 2016 as of August 2018, but the steps needed for older and newer versions of Word and Excel are very similar if not identical.]
1. Modify the Excel Spreadsheet
The first way is to avoid the problem: In the Excel worksheet, insert a column with a formula that converts the Excel numbers or dates into a text format that is exactly the same as what you would want to appear in your Mail Merge document.
To do this, you need to use Excel’s TEXT function, which enables you to convert a number or date into its equivalent text formatted exactly the way you desire. The downside is that you need to know certain formatting codes. Although these codes are identical to those used in the Custom Number formatting feature of Excel, they are rarely seen by most Excel users.
For example, the formulas TEXT(B3, “$#,##0.00”) and TEXT(C5, “M/dd/yy”) convert number and date data into textual data (in this case, “$12,345.67” and “12/01/10”).
(Tip: It is a good idea to format the cells containing these formulas in a different style, say, italic, or some unusual color to remind you that these numbers are simply text. In older versions of Excel, these “numbers” could not be used in calculations. In Excel 2016, they can be used in all formulas except aggregate functions, such as, SUM and AVERAGE.)
The advantage of formatting numbers and dates as text is that text is transported from Excel into a Word Mail Merge document unmolested. Well, almost unmolested. Formatting options such as font, size, and color do not make the trip.
Format Codes for Excel’s TEXT Function
 A collection of the most commonly used codes is presented at the right. A key thing to remember is that both “0” and “#” act as placeholders for digits, but “0” will force leading or trailing zeros to appear. The “#” placeholder will be replaced by a digit only if it is not a leading or trailing zero. Thus, the code “00000” will ensure that the leading zero is not truncated from New Jersey postal zip codes.
These codes for numbers, dates, and times can be used in the TEXT function or in Excel’s Custom number formats. As an extra bonus, they can also be used in the “Numeric Switches” in Word Mail-Merge Fields described in the next section.
Unfortunately, there is a slight difference between the way these codes work in Excel and Word in Microsoft Office 2013. In Excel, you can use either “M” or “m” for months or minutes. In almost all cases, Excel is smart enough to figure out which units you are talking about. But Word is not so smart, and you must use the capitalized letter to refer to months. Also, Excel has an additional code, “MMMMM”, which returns a single letter abbreviation for the month (e.g., “J, F, M, A, …”).
Supplementing a spreadsheet table with a few columns featuring TEXT functions is a simple and direct approach. Just remember that these cells may look like they contain numbers, but they cannot be used in SUM or AVERAGE functions. If you need to convert them into numbers again, just use the VALUE function.
Handle with Care: The ROUND Function
Instead of the TEXT() function, some users prefer to use the ROUND() function to trim off extra decimal places. As its name implies, Excel’s ROUND() function will permanently round a number up or down to the number of decimal places you specify. The advantage is that the rounded number is not text and can still be used for further calculations. In many cases, the ROUND() function will work well with Mail Merge, but you may want to steer clear of it because of the following reasons:
- The ROUND function will not preserve the dollar sign or the thousands separator (comma)
- The ROUND function will truncate trailing zeros
- The ROUND function sometimes causes Mail Merge to display the wrong number of decimal places. For example, a Mail Merge document occasionally shows 4 decimal places when the ROUND function had specified 2 or 3.
In rare cases, the ROUND function causes Mail Merge to show a slightly different number. For example, instead of displaying 1.0014, Mail Merge showed 1.0013.
Okay. But let’s say that you can’t or don’t want to change your Excel spreadsheet. Well, there is something we can do in Word:
2. Use a “Numeric Switch” in Word
The second way to cajole Mail Merge into displaying numbers from Excel correctly is to modify the Word document. Specifically, this means applying the desired number format code to the Merge Fields in the Word document. (The merge fields basically tell the Word document which column in the Excel table has the desired data.) To apply a format to a field, you must include a numeric switch (formerly called a picture switch) in the field’s field code.
The first thing you have to do is to see the actual field code. Open the Mail Merge document and click the Mailings tab at the top of the window. Be sure the Preview Results button is toggled off so that you can see the Mail-Merge fields. Then right-click a Mail-Merge field (such as «Donation») and choose the Toggle Field Code option. You should now see the actual field code for that field, which is designated by curly braces as in { MERGEFIELD Donation }. Now edit the field code by simply inserting a numeric switch code to the end of the field code, as in
{ MERGEFIELD Donation \# $#,##0.00 }
There are many picture codes available. Here are four examples with their respective results:
{ MERGEFIELD Cost \# 00.00 }              01.00
{ MERGEFIELD Sales \# $### }               $ 15
{ MERGEFIELD Sales \# $#,##0.00 }    $ 1,500.00
{ MERGEFIELD Date \@ "MMMM d" }     November 26
As you can see, the numeric switch codes are identical to the Excel formatting codes except that they are preceded by “\#” for numbers and “\@” for dates. (Note the use of quotation marks in the date code but not in the number codes.) To see more of the codes available, refer to the table below, or see the online help for “numeric switch” in Microsoft Word.
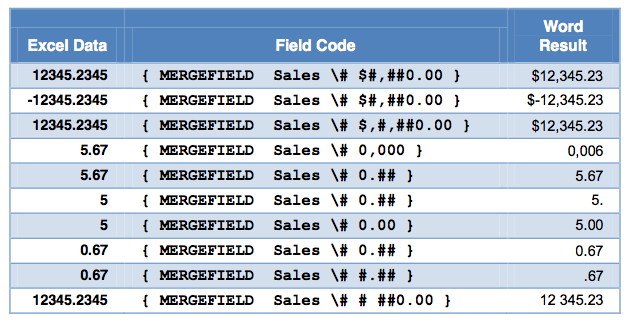
Here are some examples of how the numeric field codes work with data in a column labeled “Sales” in an Excel spreadsheet.
Numeric Switches for Mail-Merge MergeFields
In light of the fact that Word and Excel use the same formatting codes, we could not help wondering why they don’t use the same function format. For example, why not have the MergeField function look something like:
{ MERGEFIELD(Donation,"$#,##0.00") }
Good question. You’ll have to ask Microsoft.
Note: Before you start cursing me out, try to remember that when you add or change a numeric switch, the effect may not be shown immediately. You either have to update the field (right-click it and choose Update Field), or click the button Mailings > Preview Results. On one occasion I had to do this 2 or 3 times. If you are using the Mail-Merge Wizard, you may have to go back a step and return to see the effect of your changes. (Why? Again, you will have to ask Microsoft.)
The numeric switches in merge fields work well, but I find the process very difficult to remember. (“Is it a forward slash or a back slash?”) Also, it is very easy to make a mistake. Fortunately, for some users there is another way:
3. Use a DDE Link
The above approaches are relatively simple, but if you have more than a few fields that require formatting, they can drive you into early retirement. At the very least, they require you to remember format codes that, while similar, are used in very different ways.
A much more elegant and simple solution is to have Word link to the Excel workbook via a DDE (Dynamic Data Exchange) link rather than the usual, presumably non-dynamic, linking process. That sounds a little daunting, but if you are smart enough to do Mail Merge, then DDE can a piece of cake. It is a simple two-step process, and the first step — enabling Word to open a file via DDE — has to be done only once.
[Warning: Does DDE work in Office 2016 or 2019? Dynamic Data Exchange is an old technology, and it looks like Microsoft is in the process of pulling the plug on it. Sometimes it works for me in these fairly new versions, but lately it rarely works.
One trick you could try is to be sure that the Excel data source is open before you access it from Word. As usual for Excel data sources, the table must begin on the first row of the first worksheet in the workbook file. If you do this, and have some patience, you should be able to get it to work. But, beware: It may not work all the time.]
To set up Word for DDE links, do the following:
- Click: File > Options.
- Click the Advanced tab on the left and scroll down to the section General.
- Check the box labeled Confirm file format conversion on open.
That’s all for the first step, and you never have to do it again. From now on, your copy of Word can open up many different types of files, and can open these by different avenues, including DDE. 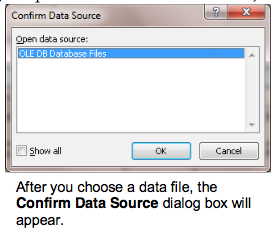 The only side effect of the above is that every time you open a non-Word file with Word, the program will give you a chance to change your mind. No problem.
The second and last step has to be done each time you select a data source for your Mail Merge operation (either in Step 3 of Word’s Mail Merge Wizard or after you press the Select Recipients button in the Mailings ribbon). Relax. It is just three additional mouse clicks:
- After you have chosen the data file you would like to use, a new “Confirm Data Source” dialog box will appear.
- The default type of link is by OLE, but that is not what you want.
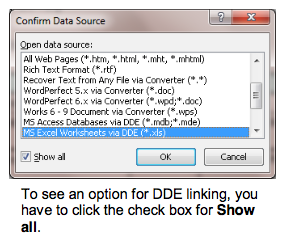 In the Confirm Data Source dialog box, click the check box to Show all.
- In the expanded list of file types, choose MS Excel Worksheets via DDE (*.xls). (Choose this even if you are using the newer Excel file format: *.xlsx.)
- If asked, confirm that you are selecting the Entire Spreadsheet.
If you have already selected a spreadsheet for your Word document, you may have to select it again, this time via a DDE link. That’s it! From now on, your Excel formatting will travel over to Word Mail Merge documents fairly intact. One huge caveat here: Make sure that the data you want to merge are in the first sheet of your Excel workbook. (It took us two hours to finally figure out that DDE does not see anything but the first Excel worksheet!)
It is a shame that Microsoft has not replaced DDE with a new technology that works in a similar manner. When DDE worked, it was marvelous. Let’s hope an equally marvelous technology will appear in the near future.
Does DDE work for you in Word 2016 or 2019? If you have a comment about that or any other issue related to Mail Merge number formatting, please let me know. Click here to post an anonymous comment.
it just worked for Me !!! the last option use a DDE link… Great !!
Glad to hear it! – Rich
just save Excel sheet to csv. DDE is gone.
Thank you so much! I’m working in 2016 and couldn’t make any of these options work. I took a chance in the comments section and then tried every CSV option available (because DDE is indeed gone). CSV (MS-DOS) was the option that worked for me! I had to remap a few fields for the mailmerge, but saved me hours of work.
You are a genius! We’ve been wracking our brains trying to format the excel document rather than looking at Word.
Thank you.
Thanks for the DDE tip, works a treat!
It just worked for me. A toggle case codes option, Great!
Thank you so so much 😉
LOL: “…why didn’t the geniuses at Microsoft simply do this by default?” In my 25 years of teaching MS Office apps, I’ve never been able to answer that question, or any of its spin-offs. I’ve also rarely found such well-written and user-friendly instructions as I find on your site. Thanks so much, Rich, for reminding all of us MSO-sufferers that this stuff can be solved, and we can have fun doing it. Much appreciated!
Thanks for your help! Solution #2 was the one that worked for me.
used to use DDE. It stopped working. I did the change in the advanced tab to confirm source, but it doesn’t. I will try rebooting. sometimes these things don’t take effect right away. fingers crossed!
I’m using Office 2016 & using DDE would not work for me. I received error message ‘Word could not re-establish a DDE connection to Microsoft Excel to complete the current task.’ Wish it could have been that easy. Guess I’ll try one of the other options.
Thank you.
Method 2 worked great for me because I just had one field that needed formatting.
Thanks so much for the information.
The last option has always worked for me except for very large mail merges but also, doesn’t seem to work well at times with Microsoft Office 2016 for larger, it actually opens the spreadsheet and prompts a save to blank spreadsheet very strange.
Hello there,
In the absence of any other advice online I’ve found this page and I’d like to thank you for steering me in the right direction… however….
I am trying to do a merge from Access into Word, but despite the Access table having a format applied to the field (application id: it should read “NA-CCF-x” with x being the record number, so record 5 would be NA-CCF-5. To achieve this I have followed your advice above and the toggled code is { MERGEFIELD ID \# NA-CCF-#}.
Unfortunately what I actually get is NA [space] CCF [space]5, as in no ‘-‘ in between the lettering and number. I’ve tried everything that I can think of; adding quotes, different special characters but the ‘-‘ simply doesn’t want to display as an actual character. Clearly there’s some significance to it being the minus key and one I’m not familiar with.
Please could you advise on how I can get this field to show the text in my preferred format?
many thanks
Su
Actually, scrap that! I found it!
Instead of using quote marks, I should have used apostophe’s!
Thank you anyway; without your initial help I wouldn’t have even got this far.
Best wishes,
Su
Thank you so much for this article. I have been frustrated by the number formatting for several years and it was so easy to fix with your advice.
This was very helpful and better advice than Microsoft’s own recommendations that steered me into using DDE, which didn’t work well for me using Office 2016. Steps 1 and 2 were the solutions. Thank you for this article.
Thank you. You are my hero. I went with Method #2, using the numeric switches, since I felt that the “bug” should be fixed in the receiving Mail Merge document. I must have spent two or more hours on this. The Office Help had an article about the DDE approach which seemed promising but turned out to be a waste of time since, as you point out, I am using Office 2016 and DDE is not supported there.
it worked the first time, but when i opened again and did the same steps, it says IT CANNOT ESTABLISH A CONNECTION
HOLA NO HE PODIDO AGREGAR DECIMÁLES EN ZERO AL FINAL
Awesome! Using Word and Excel 2016 and the DDE approach worked perfectly. Thank you! I’ve been beating my head on the monitor for 3 days. This was the answer.
Thanks again!
I was about to throw my work computer out the window. The last option worked for me in Word 2016. Thank you very much!
This was great! Really struggling with Word messing with my Excel data (grade book / report card combo). Cleaned it right up!
Thank you so much!
I used the 2nd option with the numeric switch. It was very simple! I added more # signs and commas to account for numbers larger than 9,999. Worked like a dream. Thank you!
My Letters looks professional…Thank you so much for this article.
Thank you for your help. I used the Numeric Switch and it worked perfectly.
Thank you. DDE wasn’t working for me, so ‘numeric switch’ in work was exactly what I needed! Thank you very much.
I need a small help regarding this. What shall I use incase of mail merge of a field contains indian currency in lacs. For eg – 12,45,678. I want both the commas for thousand and lacs place.
I need the negative number to show with RED font color and parentheses before and after. Please advise.
A site called computergaga has a good description of how to set up conditional formatting in Mail Merge. Go to: https://www.computergaga.com/blog/conditional-formatting-with-mail-merge-fields-in-word/
OMG thank you for ever posting!!
DDE LINK worked for me today and let me continue on with my already difficult project, so thank you!
Years later and works with Office 365. Thank you very much.
The text function worked great! Thank you!
Thank you so much. I was struck with the date format option but used the DDE Link option – It works for me flawlessly.
I had to use the #2 approach in Office 365. It took some time to set up for all my fields, but will save me so much time down the road, as I use it weekly for crew time cards. Hitting the Update Field seemed to be an important step that I had forgotten that made it work when I saved and closed it, then re-opened to be sure it still worked. Last time I tried this, it didn’t save properly and I had to do it all over again. Thank you SO much!!!!!
Thanks so much! The DDE worked like a charm!!
Freakin’ awesome! Fixed my mail merge–no more zeroes or empty lines!